Friday, 17 March 2017

GET & POST requests in Java


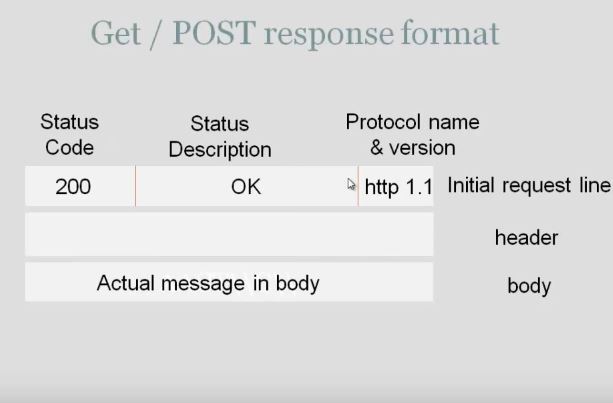
    In case of GET we send the data inside the URL  not in Body packet.


In case of POST we don't send the data inside the URL,send inside Body packet.


Friday, 10 March 2017

Setup Ruby On Rails on Windows 10 & Linux subsystem

Setup Ruby On Rails on
Windows 10

A guide to setting up a Ruby on Rails development environment

This guide is a work in progress as the new Bash on Ubuntu on Windows Linux Subsystem is in beta. There is a lot of functionality not implemented yet so you'll find that, while the basics might work, some of the more advanced and complex things won't.
 This will take about 45 minutes.
We will be setting up a Ruby on Rails development environment on Windows 10.
The reason we're going to be using Bash on Ubuntu on Windows because it allows you to run Linux on your Windows machine. Most Ruby on Rails tutorials and dependencies work best on Linux, so this allows you to get the best of both worlds. A Windows machine for your day to day work, and a Linux subsystem for Ruby on Rails development.
This only works on 64-bit installations of Windows. This is also in beta, so this won't be nearly as robust as running a Linux virtual machine, but it can definitely do the basics well enough.
Bash on Ubuntu on Windows is the name for the Linux Subsystem that's in beta right now for Windows. It allows you to run Linux on Windows without having to run a VM.
Right now, this update is only available to those on the "Fast" option in the Windows Insider program. You'll want to join the Windows Insider program and set your Insider level to "Fast".
Here's how you can join the Windows Insider program.
The first step is to enable "Developer mode" in Windows. You can do this by opening up Settings and navigating to to Update & Security, then "For Developers". Click the "Developer mode" option to enable it.
Developer mode
Now we need to enable to Windows Subsystem for Linux. You can do this by opening Control Panel, going to Programs, and then clicking "Turn Windows Features On or Off". Looking for the "Windows Subsystem for Linux" option and check the box next to it.
Subsystem for linux
The earliest working version of this for me is Windows 10 release 14352. If Windows Subsystem for Linux doesn't show up in the list right away, you may need to make sure you're part of the Windows Insider program and set to the "Fast" level, update Windows, reboot, or wait a few days for the option to become enabled. I enabled Developer mode and had to wait two days or so before the option became available. I'm not sure how this feature propogates, but try a couple of these options and you should get it.
Once you've got this installed and after rebooting, we can start setting up Bash on Ubuntu on Windows.
Start by searching for "bash" in the start menu.
Bash
Next we'll follow the installation steps to get Bash on Ubuntu on Windows installed.
Installing bash
Once that's complete, you can open up the Start menu again and search for "Bash". This time it will have the Ubuntu logo.
Bash on ubuntu on windows
Now you've got a functional Ubuntu Linux installation running on your Windows machine!
Hello linux
From here we can follow the normal Ubuntu setup steps to install Ruby, Rails, and our database.
Choose the version of Ruby you want to install:
The first step is to install some dependencies for Ruby.
sudo apt-get update
sudo apt-get install git-core curl zlib1g-dev build-essential libssl-dev libreadline-dev libyaml-dev libsqlite3-dev sqlite3 libxml2-dev libxslt1-dev libcurl4-openssl-dev python-software-properties libffi-dev
Next we're going to be installing Ruby using one of three methods. Each have their own benefits, most people prefer using rbenv these days, but if you're familiar with rvm you can follow those steps as well. I've included instructions for installing from source as well, but in general, you'll want to choose either rbenv or rvm.
Choose one method. Some of these conflict with each other, so choose the one that sounds the most interesting to you, or go with my suggestion, rbenv.
Installing with rbenv is a simple two step process. First you install rbenv, and then ruby-build:
cd
git clone https://github.com/rbenv/rbenv.git ~/.rbenv
echo 'export PATH="$HOME/.rbenv/bin:$PATH"' >> ~/.bashrc
echo 'eval "$(rbenv init -)"' >> ~/.bashrc
exec $SHELL

git clone https://github.com/rbenv/ruby-build.git ~/.rbenv/plugins/ruby-build
echo 'export PATH="$HOME/.rbenv/plugins/ruby-build/bin:$PATH"' >> ~/.bashrc
exec $SHELL

rbenv install 2.4.0
rbenv global 2.4.0
ruby -v
The last step is to install Bundler
gem install bundler
rbenv users need to run rbenv rehash after installing bundler.
We'll be using Git for our version control system so we're going to set it up to match our Github account. If you don't already have a Github account, make sure to register. It will come in handy for the future.
Replace my name and email address in the following steps with the ones you used for your Github account.
git config --global color.ui true
git config --global user.name "YOUR NAME"
git config --global user.email "YOUR@EMAIL.com"
ssh-keygen -t rsa -b 4096 -C "YOUR@EMAIL.com"
The next step is to take the newly generated SSH key and add it to your Github account. You want to copy and paste the output of the following command and paste it here.
cat ~/.ssh/id_rsa.pub
Once you've done this, you can check and see if it worked:
ssh -T git@github.com
You should get a message like this:
Hi excid3! You've successfully authenticated, but GitHub does not provide shell access.
Choose the version of Rails you want to install:
Since Rails ships with so many dependencies these days, we're going to need to install a Javascript runtime like NodeJS. This lets you use Coffeescript and the Asset Pipeline in Rails which combines and minifies your javascript to provide a faster production environment.
To install NodeJS, we're going to add it using the official repository:
curl -sL https://deb.nodesource.com/setup_4.x | sudo -E bash -
sudo apt-get install -y nodejs
And now, without further adieu:
gem install rails -v 5.0.1
If you're using rbenv, you'll need to run the following command to make the rails executable available:
rbenv rehash
Now that you've installed Rails, you can run the rails -v command to make sure you have everything installed correctly:
rails -v
# Rails 5.0.1
If you get a different result for some reason, it means your environment may not be setup properly.
Rails ships with sqlite3 as the default database. Chances are you won't want to use it because it's stored as a simple file on disk. You'll probably want something more robust like MySQL or PostgreSQL.
There is a lot of documentation on both, so you can just pick one that seems like you'll be more comfortable with. If you're coming from PHP, you may already be familiar with MySQL. If you're new to databases, I'd suggest skipping to setting up PostgreSQL.
You can install MySQL server and client from the packages in the Ubuntu repository. As part of the installation process, you'll set the password for the root user. This information will go into your Rails app's database.yml file in the future.
sudo apt-get install mysql-server mysql-client libmysqlclient-dev
Installing the libmysqlclient-dev gives you the necessary files to compile the mysql2 gem which is what Rails will use to connect to MySQL when you setup your Rails app.
When you're finished, you can skip to the Final Steps.
Postgresql installation currently fails on creating the default cluster. could not create shared memory segment: Function not implemented"
We currently don't have any fixes for this, so we recommend using MySQL for now.
For PostgreSQL, we're going to install the latest version in the Ubuntu repository.
sudo apt-get install postgresql-common postgresql libpq-dev
The postgres installation doesn't setup a user for you, so you'll need to follow these steps to create a user with permission to create databases. Feel free to replace chris with your username.
sudo -u postgres createuser chris -s

# If you would like to set a password for the user, you can do the following
sudo -u postgres psql
postgres=# \password chris
When you create a new Rails app, you might run into the following error: parent directory is world writable but not sticky.
If you run into this issue, you can run chmod +t -R ~/.bundle and that should fix the permissions errors and let you finish the bundle install for your Rails app.
And now for the moment of truth. Let's create your first Rails application:
#### If you want to use SQLite (not recommended)
rails new myapp

#### If you want to use MySQL
rails new myapp -d mysql

#### If you want to use Postgres
# Note that this will expect a postgres user with the same username
# as your app, you may need to edit config/database.yml to match the
# user you created earlier
rails new myapp -d postgresql

# Move into the application directory
cd myapp

# If you setup MySQL or Postgres with a username/password, modify the
# config/database.yml file to contain the username/password that you specified

# Create the database
rake db:create

rails server
You can now visit http://localhost:3000 to view your new website!
Now that you've got your machine setup, it's time to start building some Rails applications.
If you received an error that said Access denied for user 'root'@'localhost' (using password: NO) then you need to update your config/database.yml file to match the database username and password.

rails --version command not working on Windows


I installed Rails from http://railsinstaller.org/en on my Windows 7 desktop and the installation went fine. However, after installation when I do:
C:\Sites>rails --version
The system cannot find the path specified.

C:\Sites>ruby -v
ruby 2.2.4p230 (2015-12-16 revision 53155) [i386-mingw32]

C:\Sites>gem -v
2.4.5.1


--------------------------------------------------------------------------------------------------------------
After much digging around I found errors in a few of the *.bat (nokogiri, scss,...) files located in C:\path\to\RailsInstaller\Ruby2.2.0\bin.
This was the content of rails.bat:
@ECHO OFF
IF NOT "%~f0" == "~f0" GOTO :WinNT
@"C:\Users\emachnic\GitRepos\railsinstaller-windows\stage\Ruby2.2.0\bin\ruby.exe" "C:/Users/emachnic/GitRepos/railsinstaller-windows/stage/Ruby2.2.0/bin/rails" %1 %2 %3 %4 %5 %6 %7 %8 %9
GOTO :EOF
:WinNT
@"C:\Users\emachnic\GitRepos\railsinstaller-windows\stage\Ruby2.2.0\bin\ruby.exe" "%~dpn0" %*`
After removing the hardcoded paths C:\Users\emachnic\GitRepos\railsinstaller-windows\stage\Ruby2.2.0\bin\, the rails command reports the correct version:
C:\path\to\RailsInstaller3.2\Ruby2.2.0\bin>rails -v
Rails 4.2.5.1


----------------------------------------------------------------------------------------------------------------

goto c:\railsinstaller\ruby\bin\
gem install rails

-----------------------------------------------------

goto c:\RailsInstaller\develpmentkit\

->   ruby dk.rb init

->    ruby dk.rb install


if it won't work last command then edit the    "config.yml"


--------------------------------------------------------
# This configuration file contains the absolute path locations of all
# installed Rubies to be enhanced to work with the DevKit. This config
# file is generated by the 'ruby dk.rb init' step and may be modified
# before running the 'ruby dk.rb install' step. To include any installed
# Rubies that were not automagically discovered, simply add a line below
# the triple hyphens with the absolute path to the Ruby root directory.
#
# Example:
#
# ---
# - C:/ruby19trunk
# - C:/ruby192dev
#
---

  - C:\RailsInstaller\Ruby2.3.0


--------------------------------------------------

=>      rails new  myrubyblog


    if any gems fail follow the above procedure


---------------------------------------------------------------------

error installing websocket


==> goto devkit


cd C:\Ruby21 or c:\railsinstaller\devkit
devkitvars.bat
gem install websocket-driver -v '0.6.3'
-------------------------------------------------------------------


*any gems installation problem try below

bundle update && bundle install

--------------------------


Sunday, 26 February 2017

Ruby


1) rand(99) ->  9  produces random number

---------------------------------------------------------------------------
2)attr_accessor :var
attr_reader :var 
attr_writer :var

You may use the different accessors to communicate your intent to someone reading your code, and make it easier to write classes which will work correctly no matter how their public API is called.
class Person
  attr_accessor :age
  ...
end
Here, I can see that I may both read and write the age.
class Person
  attr_reader :age
  ...
end
Here, I can see that I may only read the age. Imagine that it is set by the constructor of this class and after that remains constant. If there were a mutator (writer) for age and the class were written assuming that age, once set, does not change, then a bug could result from code calling that mutator.
But what is happening behind the scenes?
If you write:
attr_writer :age
That gets translated into:
def age=(value)
  @age = value
end
If you write:
attr_reader :age
That gets translated into:
def age
  @age
end
If you write:
attr_accessor :age
That gets translated into:
def age=(value)
  @age = value
end

def age
  @age
end
---------------------------------------------------------------------

Hash

https://docs.ruby-lang.org/en/2.0.0/Hash.html

-------------------------------------------


Removing DRM from kindle books

How to Remove DRM from Kindle & eBooks with Calibre

Even if you purchase eBooks from Amazon for your Kindle device, some of them might contain DRM which prevents you from copying them to read on other devices. There are several reasons why DRM is a bad thing for consumers, but there might be laws in your region that protect its placement. Before continuing with removing it, be sure to check your local regulations. And, I don’t recommend sharing books with others that you’ve removed DRM from. This guide is designed for personal use and backup, in which case you shouldn’t run into any problems.
Note: This does not work for pulling protected books directly from a Kindle Fire Android tablet. This will however work on E-inks and some other non-Kindle tablets.

Required Downloads for PC

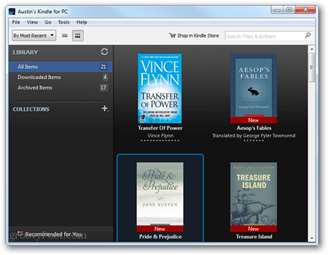
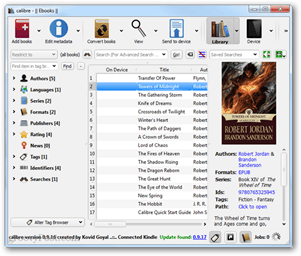
The first thing you need to do is download and install Calibre and Kindle for PC. Then setup and download your books onto Kindle for PC.
kindle for pccalibre
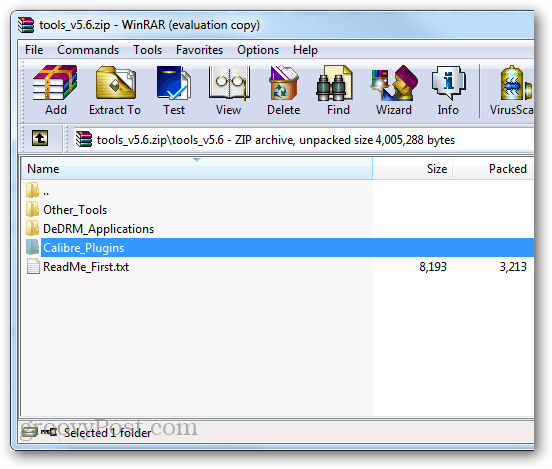
Once you have those two programs installed, you need to configure Alf’s DRM tools for Calibre. Unzip the tools_v#.#.zip folder that was downloaded from Alf’s, and then put the Calibre_Plugins folder somewhere you’ll be able to easily find it.
alfs dedrm tools
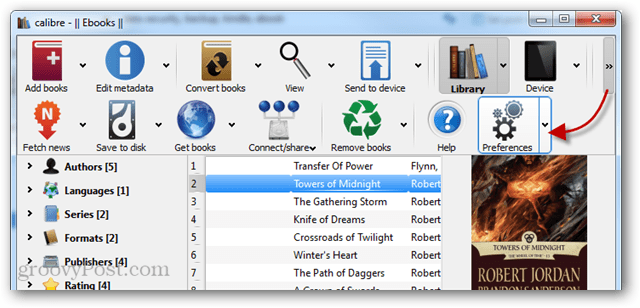
Now open up Calibre preferences. This can be done by clicking the right arrows and then selecting the gear icon that says Preferences.
calibre preferences
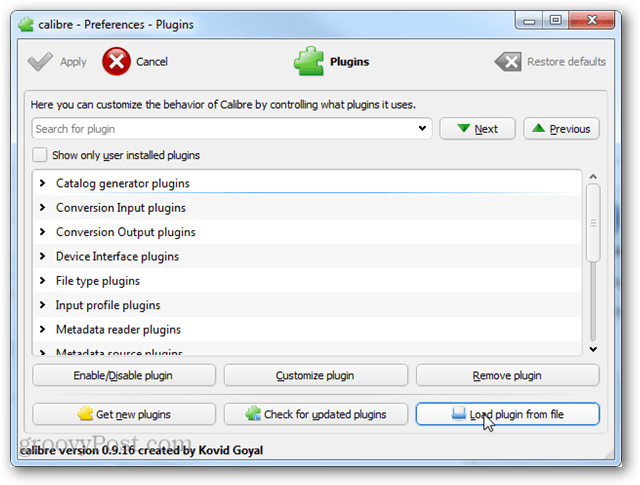
In the Preferences window click Plugins.
plugins
Select to “Load plugin from file.”
load plugin from file
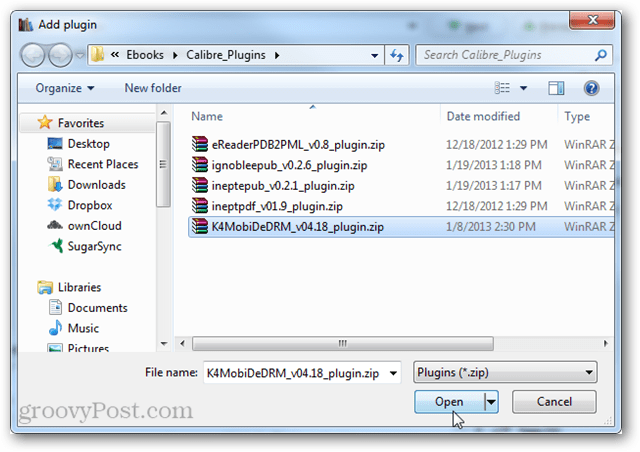
Now browse to the Calibre_Plugins folder extracted from Alfy’s pack. Open the first zip file on the list, and then repeat the process again for all five of the plugin zip files.
add plugins
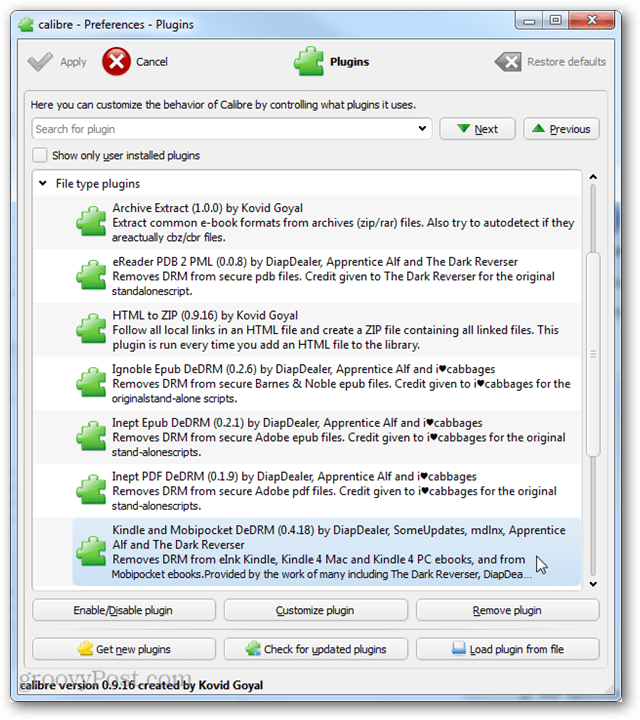
After you’ve added all of the plugins they’ll be listed in the “File type” plugins list of Calibre. If you’re running a Kindle device (except Fire) the Kindle and Mobipocket DeDRM plugin can be configured further to pull books directly from the device.
add serial to plugin
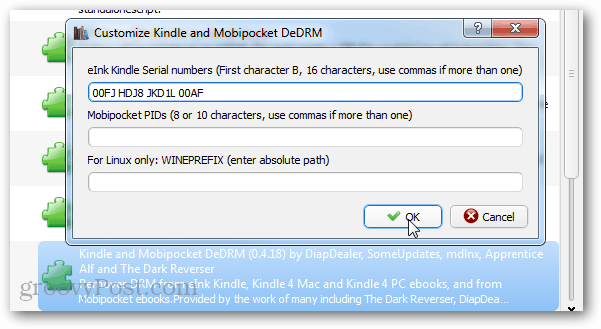
Within the plugin settings you can add the Kindle’s serial number. If you don’t know it, you can gather your 16 digit serial number from Amazon’s website under the Manage My Devices area. After you’ve entered it, click OK and Apply to save changes.
Note that this serial number is only necessary if you are going to pull DRM protected books directly off of your Kindle device.
add device serial to decrypt kindle books
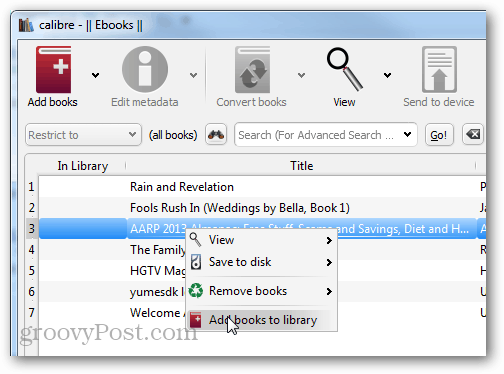
Now there’s two ways to remove DRM using the plugins. The first is by pulling it directly off of the device in Calibre. There should be a new “Add books to library” function that will decrypt the book and make it readable in Calibre for export and conversion.
add books to library
The second is by adding books downloaded with Kindle for PC. These are stored in the following folder:
  • %userprofile%\documents\My Kindle Content
Just adding them to Calibre should decrypt them.
add booksselect books from k4pc download folder
That should handle removing DRM from your Kindle and other books using Calibre. If you have any questions or comments, please drop them below!