Saturday, 25 February 2017

Remove a Google Chrome extension "Installed by enterprise policy"

Google Chrome extension "Installed by enterprise policy" - how to remove?

This removal guide shows how to remove a Google Chrome extension that was "Installed by enterprise policy". Note that recently, there is a rise in adware infections, and in many cases, these potentially unwanted programs (PUPs) install on users' Internet browsers disguised as legitimate extensions. Commonly, potentially unwanted applications are bundled with free software downloaded from the Internet, the installation of which, is often a consequence of not paying close attention to the installation steps.
To avoid inadvertent adware or PUP installation, Internet users should always install freeware choosing the 'Custom Installation' option rather than 'Typical Installation' - and be sure to opt-out of any changes to your Internet browser settings. Also, disallow installation of any additional software. In this removal guide I will demonstrate how to remove the "Coupon Server" Google Chrome extension that is marked as "Installed by enterprise policy". I chose this extension simply as an example, however, this removal guide is generic and will help you to remove any Chrome extension that is marked as installed by enterprise policy.
To check the Google Chrome extensions: Click on the bars icon (top right corner of Google Chrome), select 'Tools' and click 'Extensions'.
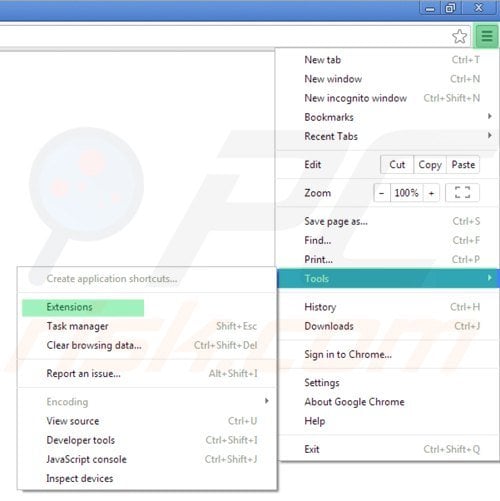
Checking Google Chrome extensions list
Here is an example of a Chrome extension that is marked as "Installed by enterprise policy" (it is greyed-out, and therefore, users are unable to disable or remove it):
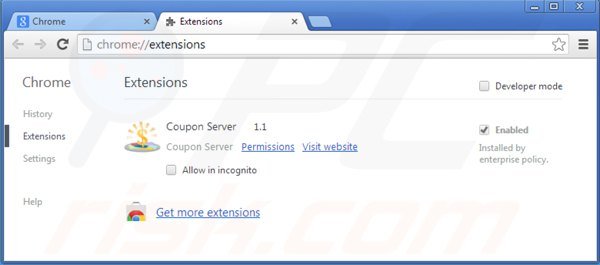
Google Chrome extension "Installed by enterprise policy" example
When dealing with "Installed by enterprise policy" Google Chrome extensions, first check for any recently-installed software within your operating system's 'Add/remove programs'. In some cases, uninstalling this software will also eliminate the associated Internet browser extension.
Windows 8 users:
Right-click in the lower left corner of the screen, in the Quick Access Menu select "Control Panel". In the opened window choose "Uninstall a Program." Look for recently added software, select the entry and click Uninstall.
Windows 7 users:
Click "Start" ("Windows Logo" in the bottom left corner of your desktop), choose "Control Panel". Locate "Programs and Features". Look for recently added software, select the entry and click Uninstall.
Windows XP users:
Click "Start", choose "Settings" and click "Control Panel". Locate and click "Add or Remove Programs". Locate "Programs and Features". Look for "recently added software, select this entry, and click Remove.
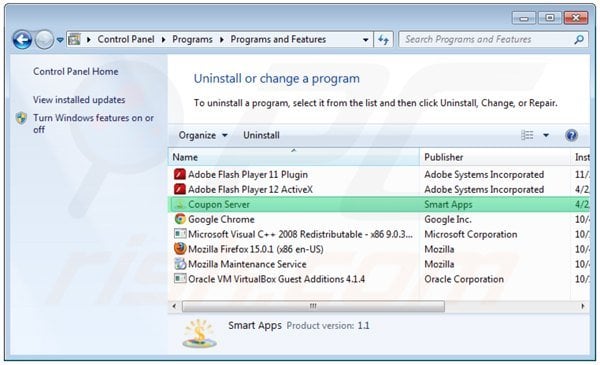
Uninstalling potentially unwanted applications via Control Panel
After uninstalling the unwanted software, check your Internet browser extensions. If you continue to observe unwanted entries in your Google Chrome extensions list, continue with the removal instructions.
Firstly, you need to make a note of the ID of the unwanted "Installed by enterprise policy" extension. You will need this in later removal steps to verify the ID of an extension. Click on the bars icon (top right of the Google Chrome), select "Tools" and click on "Extensions", select "Developer Mode". 
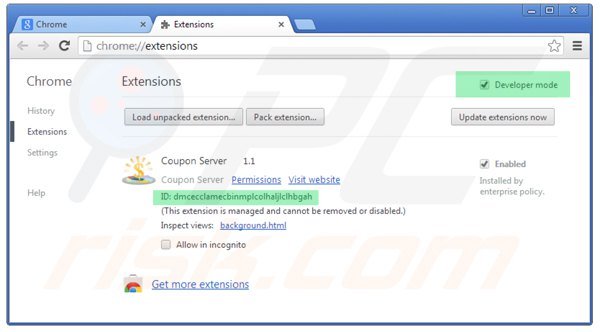
Checking the id number of the Google Chrome extension
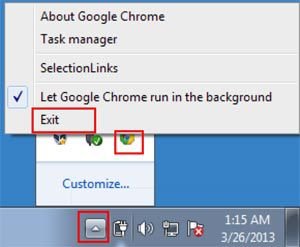
To remove the "Installed by enterprise policy" Chrome extension, you firstly need to close Google Chrome:
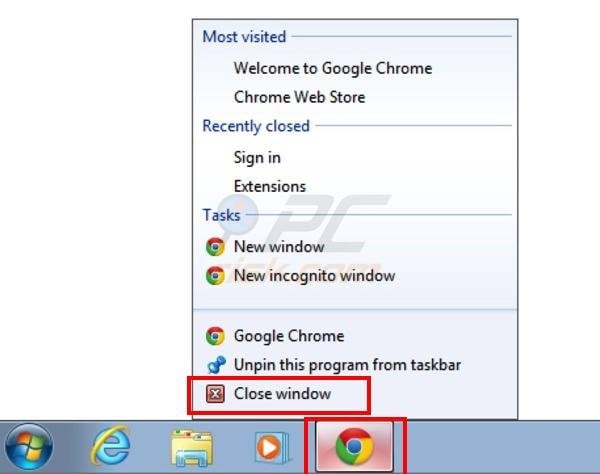
Close Google Chrome
Close any runing Google Chrome browsers
After closing Google Chrome, remove the registry entries of the "Installed by enterprise policy" extension:
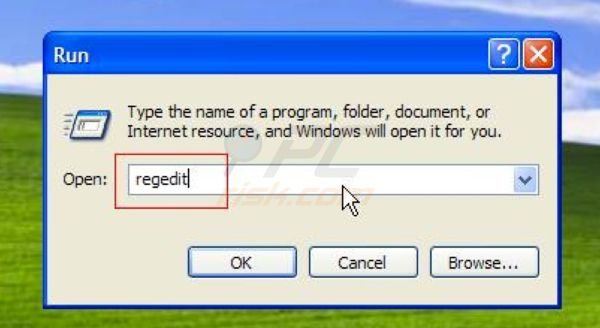
In Windows XP - Click Start, Run. In the opened window type "regedit".
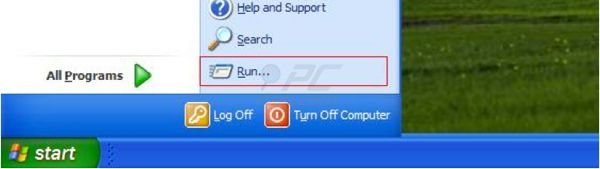
Start, run in Windows XP
regedit Windows XP
In Windows 7 - Click Windows Logo (Start), in the "Search Programs and Files" field, type "regedit" and press Enter.
Windows 7 regedit
In the opened Registry Editor click "Edit" and select "Find...".
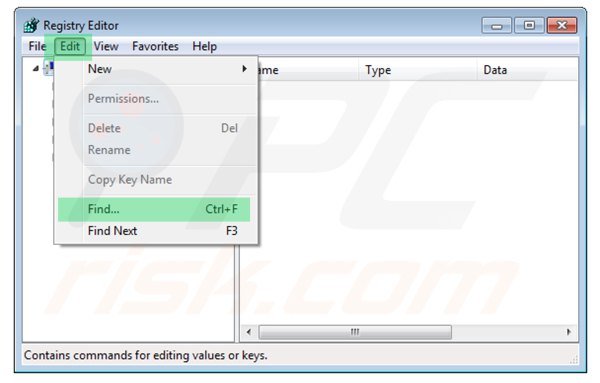
Finding the registry entries of the "Installed by enterprise policy" extension
In the opened window paste the ID of the "Installed by enterprise policy" Chrome extension which you are trying to remove and click "Find next" button.
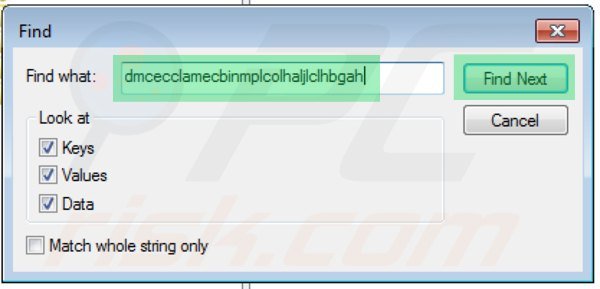
Finding the registry entries of the "Installed by enterprise policy" Google Chrome extension step 2
Remove the registry key matching the Data value of the "Installed by enterprise policy" extension's ID (right click on the registry key and select "Delete"):
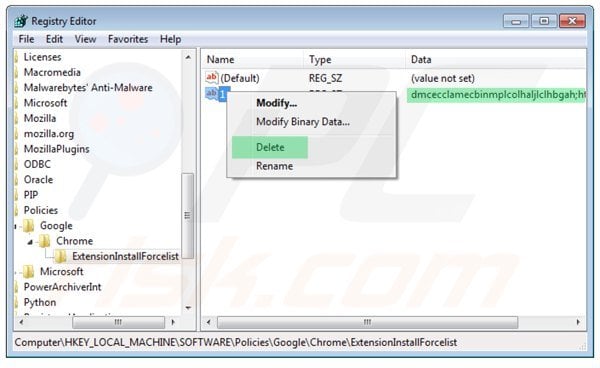
Deleting the registry entry of an "Installed by enterprise policy" extension
Confirm that you want to remove the registry entry by clicking "Yes" button.
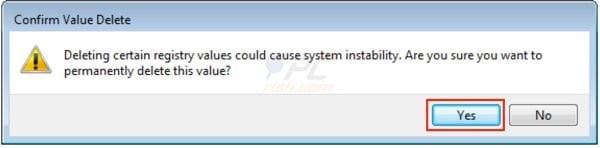
Confirm value delete
After removing the registry entry of the "Installed by enterprise policy" Chrome extension, remove the associated files. To do this, Open "My Computer" and navigate to "C:\Users\YOUR USER NAME\AppData\Local\Google\Chrome\User Data\Default\Extensions". Remove the directory matching the ID of the "Installed by enterprise policy" Chrome Extension.
You can access your AppData directory by typing %USERPROFILE% (Windows XP) or %localappdata% (Windows 7 and Windows 8),  in the Run dialog box.
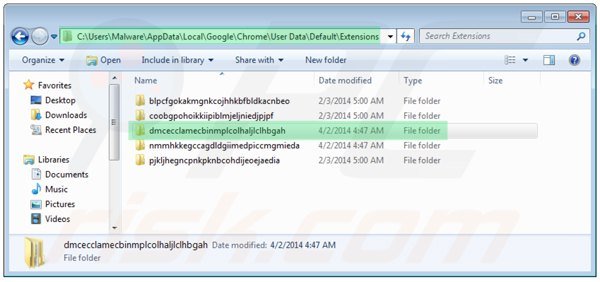
"Installed by enterprise policy" Google Chrome extension files removal
Navigate to C:\Windows\System32\GroupPolicy\Machine (or C:\Windows\System32\GroupPolicy\User) folder and remove the file named Registry.pol
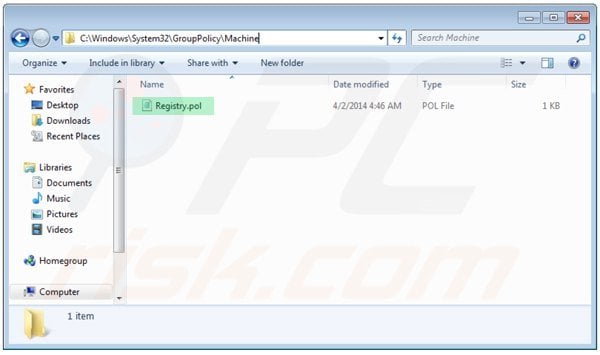
Removing registry.pol file
Finally open Google Chrome and check the extensions list. The "Installed by enterprise policy" extension should now be removed.
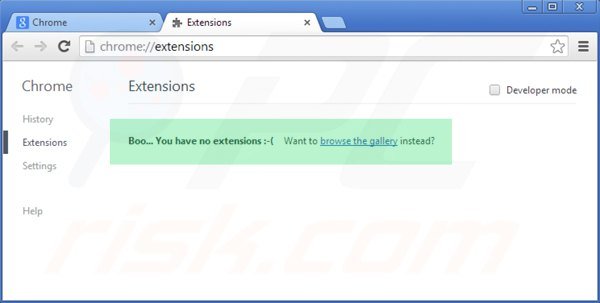
"Installed by enterprise policy" Chrome extension removed

Complete Setup Guide for Ruby, Cucumber and Watir on Windows

  Introduction

This is an updated version of our previous post on getting a cucumber installation set up on Windows. It has become one of the most popular resources for this on the web, but has aged a little since we published it in 2011.
With this updated guide, we’d like to kick off a new round of cucumber-related blog posts.

What is Cucumber?

Cucumber is an Open Source software tool for test automation. Its basic concept is that test cases should be captured in human language (a form of structured English called gherkin), but automating the execution of test cases is best done in a programming language. The cucumber tool provides the glue between the two, reporting test results in the human language again.
The next post in the series will provide an introduction to basic cucumber concepts

Installation

We’ll start this round of cucumber posts with installation instructions so you can follow the next posts as you read them.
After following these instructions, you will have installed cucumber, as well as Watir, a convenient wrapper around the industry leading Selenium browser automation framework, as well as Ruby, the programming language of choice for cucumber test automation. With all three combined, we can test web applications as demonstrated in a later post.

Software Versions

These instructions have been tested on Windows 7 and Windows 8, with both 32bit and 64bit installations. Additionally, Ruby versions 2.0, 2.1 and 2.2 have been used for these instructions.

32bit vs. 64bit

All of the software packages we’re about to install run on 32bit Windows and 64bit Windows, with one small caveat: on 64bit Windows, cucumber will produce warnings about a missing “gherkin lexer”, but otherwise work just fine. If such warnings irritate you, you can work around them with some deeper knowledge of native Ruby gems. Otherwise, we recommend sticking to 32bit packages.

Step 1: Install Ruby

On Windows, the best place to start is the RubyInstaller download page. Download and install the Ruby version of your choice. We’ll use 32bit Ruby 2.2.2 here.
In main installer window, you have four choices to make:
  1. The installation path. We’re going to use C:\Ruby in this example rather than using a version-specific installation path. Whenever you see C:\Ruby, pick the installation path you chose here.
  2. Whether to install Tcl/Tk support. This is not required for cucumber.
  3. Whether to add Ruby executables to your path. This is required for the rest of these posts to work well.
  4. Whether to associate certain files with this Ruby installation. If you have only one version of Ruby installed, this is recommended.
Ruby Installer
Ruby Installer (64 bit)

Step 2: Extract DevKit

DevKit is required for some Ruby packages (called “gems”) to be installed. It can be downloaded from the same downloads page. Note that for Ruby 2.0, 2.1 and 2.2, the same version can be used. We’re using 32bit DevKit here.
The executable is just a self-extracting archive. You can extract the archive anywhere you want, but we’ll use C:\Ruby\devkit here.
DevKit Extraction
DevKit Extraction

Step 3: Install DevKit

Once DevKit is extracted, you need to go to the Windows Command Console to install it.
  1. Run a command by pressing the Windows key and the R key.
  2. Write “cmd” into the input field.
  3. Hit enter.
Run Command Console
Run Command Console
In the command console, go to the DevKit installation path, C:\Ruby\devkit, and enter two commands to finish the DevKit installation.
C:\Users\you> cd \Ruby\devkit
C:\Ruby\devkit> ruby dk.rb init
C:\Ruby\devkit> ruby dk.rb install

Step 4: Install Cucumber and other Ruby gems

Now you’ve got your system set up for Ruby to download and install “gem” packages. To install cucumber, first update the current gem setup:
C:\Users\you> gem update --system
Next, install the gems you need for cucumber web testing. We recommend at least the following:
C:\Users\you> gem install --no-ri --no-rdoc rspec
C:\Users\you> gem install --no-ri --no-rdoc win32console
C:\Users\you> gem install --no-ri --no-rdoc watir-webdriver
C:\Users\you> gem install --no-ri --no-rdoc cucumber
You can also install multiple packages in a single command, e.g.
C:\Users\you> gem install --no-ri --no-rdoc rspec cucumber

Step 5: Run Cucumber

At this point, you should be able to execute cucumber and watch it complain about not having tests to run.
C:\Users\you\Documents> cucumber
No such file or directory - features. You can use
    `cucumber --init` to get started.
Let’s do what cucumber suggests, shall we?
C:\Users\you\Documents> cucumber --init
  create   features
  create   features/step_definitions
  create   features/support
  create   features/support/env.rb
We’ll explain all the stuff that gets created here later. Right now, if we run cucumber again now, it’ll complain a lot less:
C:\Users\you\Documents> cucumber
0 scenarios
0 steps
0m0.000s
And there you have it! Cucumber runs zero test scenarios containing zero steps, in zero seconds. That seems about right for a fresh installation!

Step 6: Install Bundler

Installing Ruby gems via the gem command is generally the way to install packages system-wide. If you work a lot on test automation suites, though, it’s quite likely that you want different versions of each package for different projects. For this purpose, the Ruby community has come up with bundler, which we thoroughly recommend to use in your test automation projects.
C:\> gem install bundler
We’ll discuss the use of bundler in later posts, but for now you should just install it so we can refer to it later.

Friday, 27 January 2017

Removing digits ,spaces in notepad ++

Ctrl+F - Replace - Search mode: regular expression
Find What: [0-9]+
Replace With:
// Replace with is empty

--------------------------------------------------------------------------------
Open the find and replace dialog (press CTRL+F).
Then select Regular expression in the 'Search Mode' section at the bottom.
In the Find what field enter this: [\r\n]+
In the Replace with
There is a space after the comma.

-----------------------------------------------------------------------------------

^[0-9]*\.\ (.*)
-------------------------------

Ctrl-H - shows replace.
Ensure that 'regular expression' is on.
Use ^[0-9]+
Note begging ^ used to mark begin of line. Remove it if need remove all numbers

Wednesday, 14 September 2016

Java Collections

import java.util.*;


public class CollectionsDemo {


public static void main(String args[])
{

List a= new ArrayList();
a.add("sri");
a.add("sahi");
a.add("teju");
System.out.print("Array : ");
System.out.print("\t"+a);


List l=new LinkedList();
l.add("nokia");
l.add("apple");
l.add("samsung");
System.out.println();
System.out.print("Linked list: ");
System.out.print("\t"+l);

Set s=new HashSet();
s.add("banana");
s.add("orange");
s.add("lemon");
System.out.println();
System.out.print("Set: ");
System.out.print("\t"+s);


Map m=new HashMap();
m.put("java", 1);
m.put("ruby",5);
m.put("html", 9);
System.out.println();
System.out.print("Map: ");
System.out.print("\t"+m);


}

}


==================================================================

Monday, 12 September 2016

Java IO operations

import java.io.FileInputStream;
import java.io.FileOutputStream;
import java.io.IOException;

public class CopyFile {

public static void main(String args[]) throws IOException {
FileInputStream in = null;
FileOutputStream out = null;

try {

in = new FileInputStream("D:/Java/MyJava/src/input.txt");
out = new FileOutputStream("D:/Java/MyJava/src/output.txt");

int c;

while ((c = in.read()) != -1) {
out.write(c);

}

} finally {

if (in != null) {
in.close();

}
if (out != null) {
out.close();

}

}

}
}


-----------------------------------------------------------------------------------------------


import java.io.*;


public class CopyFile{


public static void main(String args[])throws IOException {


FileReader in =null;
FileWriter out =null;


try{
   in = new FileReader("D:/Java/MyJava/input.txt");
   out = new FileWriter("D:/Java/MyJava/output.txt");
 
   int c;
 
   while((c= in.read())!=-1)
   {
    out.write(c);
   
   
   }
 
 
}
 finally{
 if(in!=null)
 {
in.close();
 }

 if(out!=null)
 {
out.close();

 }


 }


}


}

--------------------------------------------------------------------------------------------------


Tuesday, 6 September 2016

Accessing Godday Mysql database remotely in windows cmd

First create Database and user name in Mysql database wizard in godaddy


--------------------------------------------------------------------------------
=>

1) First go to mysql folder in  cmd (directory) in windows

C:> mysqld  --console

-> It runs the mysql server

2) open another cmd

-------------------------------------------------------------------------------

1) login with root and enter passwor


-> mysql -u root --password
 -> 1234


2)

GRANT ALL PRIVILEGES ON *.* TO  'USERNAME'@'IP'  IDENTIFIED  BY  'PASSWORD';


here user name is -> ex(srini_user)
here IP is ->  Mysql server IP address  ex(166.62.28.109)

3)

'USERNAME' is the username to be created.
'IP' is the public IP address of the remote connection.
'PASSWORD' is the password to be assigned for this username.
(IP can be replaced with % to allow this user to logon from any host or IP)
mysql> FLUSH PRIVILEGES;
mysql> exit;

-------------------------------------------------------


1)  


mysql -u srini_user -p -h 166.62.28.109


------------------------------------------------------------------------------------------
It displays the  follwing....


Welcome to the MySQL monitor.  Commands end with ; or \g.
Your MySQL connection id is 20869966
Server version: 5.5.49-cll-lve MySQL Community Server (GPL)

Copyright (c) 2000, 2016, Oracle and/or its affiliates. All rights reserved.

Oracle is a registered trademark of Oracle Corporation and/or its
affiliates. Other names may be trademarks of their respective
owners.

> mysql


------------------------------------------------------------------------------------

mysql> show databases;

Connection id:    20877375
Current database: *** NONE ***

+--------------------+
| Database           |
+--------------------+
| information_schema |
| srini_db           |
+--------------------+
2 rows in set (0.71 sec)


---------------------------------------------------


Tuesday, 30 August 2016

JUnit test cases

----------------------------------------------------------------------------------------

public class junitTest {

private String msg;
public junitTest(String msg)
{
this.msg=msg;
}

    public String printmsg()
    {
    System.out.println(msg);
    return msg;
    }
 
}
-----------------------------------------------------------------------------------


import static org.junit.Assert.*;

import org.junit.Test;


public class junitTestTest {
    
String msg="sree";
junitTest obj = new junitTest(msg);
@Test
public void testing()
{
assertEquals(msg,obj.printmsg());
}
}

=============================================================


public class MyClass {

  public int multiply(int x ,int y)

  {
  if(x>10)
  throw new IllegalArgumentException("x should be less than 10");
 
  return x*y;
 
  }
}


-------------------------------------------------------------------------------

import static org.junit.Assert.*;
import org.junit.Test;


public class MyClassTest {


@Test
  public void TestMultiply()
{
 
  MyClass test = new MyClass();
     System.out.println(test.multiply(2,3));
     assertEquals(45,test.multiply(5,9));
   
 
}  

}

=======================================================