Sunday 26 February 2017

Ruby


1) rand(99) ->  9  produces random number

---------------------------------------------------------------------------
2)attr_accessor :var
attr_reader :var 
attr_writer :var

You may use the different accessors to communicate your intent to someone reading your code, and make it easier to write classes which will work correctly no matter how their public API is called.
class Person
  attr_accessor :age
  ...
end
Here, I can see that I may both read and write the age.
class Person
  attr_reader :age
  ...
end
Here, I can see that I may only read the age. Imagine that it is set by the constructor of this class and after that remains constant. If there were a mutator (writer) for age and the class were written assuming that age, once set, does not change, then a bug could result from code calling that mutator.
But what is happening behind the scenes?
If you write:
attr_writer :age
That gets translated into:
def age=(value)
  @age = value
end
If you write:
attr_reader :age
That gets translated into:
def age
  @age
end
If you write:
attr_accessor :age
That gets translated into:
def age=(value)
  @age = value
end

def age
  @age
end
---------------------------------------------------------------------

Hash

https://docs.ruby-lang.org/en/2.0.0/Hash.html

-------------------------------------------


Removing DRM from kindle books

How to Remove DRM from Kindle & eBooks with Calibre

Even if you purchase eBooks from Amazon for your Kindle device, some of them might contain DRM which prevents you from copying them to read on other devices. There are several reasons why DRM is a bad thing for consumers, but there might be laws in your region that protect its placement. Before continuing with removing it, be sure to check your local regulations. And, I don’t recommend sharing books with others that you’ve removed DRM from. This guide is designed for personal use and backup, in which case you shouldn’t run into any problems.
Note: This does not work for pulling protected books directly from a Kindle Fire Android tablet. This will however work on E-inks and some other non-Kindle tablets.

Required Downloads for PC

The first thing you need to do is download and install Calibre and Kindle for PC. Then setup and download your books onto Kindle for PC.
kindle for pccalibre
Once you have those two programs installed, you need to configure Alf’s DRM tools for Calibre. Unzip the tools_v#.#.zip folder that was downloaded from Alf’s, and then put the Calibre_Plugins folder somewhere you’ll be able to easily find it.
alfs dedrm tools
Now open up Calibre preferences. This can be done by clicking the right arrows and then selecting the gear icon that says Preferences.
calibre preferences
In the Preferences window click Plugins.
plugins
Select to “Load plugin from file.”
load plugin from file
Now browse to the Calibre_Plugins folder extracted from Alfy’s pack. Open the first zip file on the list, and then repeat the process again for all five of the plugin zip files.
add plugins
After you’ve added all of the plugins they’ll be listed in the “File type” plugins list of Calibre. If you’re running a Kindle device (except Fire) the Kindle and Mobipocket DeDRM plugin can be configured further to pull books directly from the device.
add serial to plugin
Within the plugin settings you can add the Kindle’s serial number. If you don’t know it, you can gather your 16 digit serial number from Amazon’s website under the Manage My Devices area. After you’ve entered it, click OK and Apply to save changes.
Note that this serial number is only necessary if you are going to pull DRM protected books directly off of your Kindle device.
add device serial to decrypt kindle books
Now there’s two ways to remove DRM using the plugins. The first is by pulling it directly off of the device in Calibre. There should be a new “Add books to library” function that will decrypt the book and make it readable in Calibre for export and conversion.
add books to library
The second is by adding books downloaded with Kindle for PC. These are stored in the following folder:
  • %userprofile%\documents\My Kindle Content
Just adding them to Calibre should decrypt them.
add booksselect books from k4pc download folder
That should handle removing DRM from your Kindle and other books using Calibre. If you have any questions or comments, please drop them below!

Removing DRM from ebooks2

If you've got some Kindle books, you've likely heard that they come with Amazon's Kindle DRM, which locks your books into Kindle devices remove drm from kindle booksand kindle reading apps. But as a consumer, when we have already paid these files for money, why should we be stopped from reading them just because we didn't buy a Kindle but an iPad or a Kobo e-ink reader instead? This deeply hurts us. Yes?
So if you want to read Kindle books on non-Kindle devices or apps, the only way is to remove the DRM. And in fact it's also the best way to protect your purchases, helps us read our own books more freely, backup or copy, print or share kindle books with friends.
But, how to? You may have wondered this problem for a long time. Don't worry this article will introduce you 3 ways to remove drm from Kindle books. From here you can liberate your kindle books best.
Update on Mar. 27, 2015 -- We compiled an ultimate guide about Kindle DRM removal, so the repeated content is wiped out from this article.
Update on Sep. 10, 2015 -- We add a new method for you to help remove drm from Kindle books online.

First things first: Download Kindle books via Kindle for PC/Mac

To begin with, firstly I strongly recommend you get your kindle books prepared on your computer. Install Kindle for PC or Mac, launch the Kindle app, log in with your own amazon account, then all your purchased files in kindle store would be synced. Choose those files you want to deal with, double click on book cover, then downloading begins. Once you have done that, you can close the app, find your downloaded books files at destination folder (book folder location):
For Win: ...Users\Administrator\Documents\My Kindle Content.
For Mac: ...Library/Application Support/Kindle/My Kindle Content.
Note: If you can't find your downloaded kindle books on mac, on the pref pane follow "Kindle"--"Preferences"--"Content Folder", you will find them.
find kindle books on mac

Method 1: Remove DRM from Kindle books with Calibre Plugin

Calibre is an excellent ebook library management tool, open source software, helps you remove drm from books and convert format to others.

Step 1: Install Calibre.

Install Calibre onto your computer if you haven't already get them installed. Find the latest tools package, and unzip it.
eReaderPDB2PML_v06_plugin.zip decrypt eReader ebooks;
ignobleepub_v01.6_plugin.zip decrypt Nook ebooks;
ineptepub_v01.7_plugin.zip decrsypt Adept ePUB;
ineptpdf_v01.4_plugin.zip decrypt Adept PDF
K4MobiDeDRM_404.1_plugin.zip decrypt Kindle ebooks

Step 2: Install Calibre DeDRM Plugins.

Run Calibre on computer (here takes mac as an example).
From the pref pane "Preferences"--"Change calibre behavior".
change calibre behavior on mac
Note: Do not click “Get plugins to enhance calibre”).
Click on Plugins (under “Advanced”) --"Load plugin from file".
load plugin files on mac
Navigate to where you unzipped the DRM removal tools and select the "Calibre_Plugins" folder and then choose the K4MobiDeDRM_plugin.zip file.
  1. Click on the “Add” button, "Yes" in the "Are you sure?" warning dialogue that appears. After succeed the plug-in has been installed, OK.

Step 3: Import DRMed books to Calibre

Just import your downloaded Kindle books to Calibre, then the DRM will be removed automatically. But if you've previously added books to calibre that with drm, you'd better import them again. Job done, you can click "click to open" at the right side, to get a view at calibre library.

Method 2: Remove DRM from Kindle books with Python Scripts

Nearly all the eBook DRM Removal softwares are Python scripts, including Calibre.

Step 1: Install Python at first.

Firstly you need Python installed on your computer.

Step 2: Install Pycrypto

Pycrypto is a basic DRM module that all the DRM removal tools are using. Download and install it please.
For Mac: Search Python and Pycrypto online please.

Step 3: Run KindleBooks.pyw

Run KindleBooks.pyw, then input the information related to Kindle Books: input file, output file, and Kindle.info. As your kindle ebooks has been downloaded to your computer via Kindle for PC/Mac, so it is easy to find the Kindle.info, because it will be created when the desktop application installed.
run KindleBooks.pyw
This method is a little hard to use, so if you are not so familiar with computer or code, I don't think challenging this way is a wise choice.

Method 3: Remove DRM from Kindle books with Shareware

This method is applied to both beginners and experts. And I highly recommend you get it with a free trial. I do believe after you tried it, you will fall in love with her.
  • It uses python scripts but much more easily to operate than method 2.
  • It provides more friendly interface than calibre. Of course it's also easier than calibre to learn how to use.
Detailed guide please read this post: https://www.epubor.com/kindle-drm-removal-easily-remove-kindle-drm-azw.html, it also introduces you how to remove Kindle books DRM without Kindle for PC/Mac software, like remove DRM from Kindle Devices/Apps.
Download the tool for free:

Method 4: Remove DRM from Kindle books online

Yes this is true that now you can remove kindle drm online--Epubor Online Kindle DRM Removal. It's free.
If you had an e-ink Kindle device, things are pretty easy to go. Input the KSN, connect the Kindle to computer via USB, then drag books to remove drm. Once finished you can click the "download" to directly get your books downloaded to your own computer.
remove drm from kindle books online

Removing DRM from ebooks

How to Strip the DRM from Your Kindle Ebooks for Cross-Device Enjoyment and Archiving

kindleDRM
You’re not a Jolly Roger flying pirate, you’re just somebody that wants to backup the ebooks they paid for and read them on the devices they want to read them on. Follow along as we show you how to liberate your Kindle books.

Why Do I Want To Do This?

Most media these days, from purchased TV show episodes to ebooks to physical media like DVDS, are loaded with Digital Rights Management (DRM) schemes. The DRM schemes are put in place by the publishers as a safeguard against piracy and to control how the consumer uses the media they’ve purchased (e.g. you can watch this movie or read this book on our device, but not on our competitor’s device).
We don’t know about you, but we don’t particularly care to be told how we can enjoy the media we’ve paid good money for. In fact, we opted not to put DRM on our book The How-To Geek Guide to Windows 8 specifically for that reason. We respect you as a reader of this site, a consumer, and a person far too much to restrict how you can enjoy a book you purchase from us. After you buy it, you can read it however you want to read it on whatever device you want to read it on.
As for preventing piracy, DRM’s value in doing so is dubious at best; why would anyone go to the hassle of stripping DRM if they intended to pirate the material anyway (as DRM-free pirated copies of just about everything already exist all over the Internet). In other words, DRM poses a fairly large inconvenience to the paying customers and no inconvenience at all to the pirates.
With that in mind, read on to see how you can be an upstanding citizen that supports the people who create the content you love, but with the freedom to enjoy that content on your devices as you see fit.
Note: This tutorial will only help you strip the DRM from books you have actually purchased. The tools used herein will not work to strip the DRM from library ebooks, loaned ebooks, or other ebooks of which you are not the original purchaser.

What Do I Need?

2013-05-09_160814

For this tutorial, you’ll need three things:
You’ll absolutely need Calibre and Apprentice Alf’s excellent DRM-stripping plugins. The Kindle for PC application is entirely optional, but it does make it way easier to get to all your Kindle books at one time instead of manually transferring/downloading each book one by one.
We won’t be covering how to install and use Calibre in this tutorial. If you’re new to using Calibre we highly recommend checking out our guide: How To Organize Your Ebook Collection with Calibre.
There are a few noteworthy things before we continue. First, although we’re using Windows 7, you could follow along and use the same techniques on OS X using the OS X version of Calibre.
Second, included in the Apprentice Alf DRM removal pack are stand alone tools for both Windows and OS X. Because these tools require additional configuration including the installation of Python and various dependencies, we’ve opted to focus on the Calibre-based workflow, which is much faster (should you wish to use the stand alone tools, we would recommend reading the readme.txt included with the bundle). Further, since you’ll need an ebook management tool to organize and transfer your new DRM-free book collection, you might as well use the best one in town.

Installing Apprentice Alf’s DRM Removal Plugins

2013-05-09_121346
The removal plugins are really fantastic in that not only do they work well, but for as long as you keep them installed they will automatically strip the DRM from any future DRM-laden books you add to Calibre.
Visit Apprentice Alf’s DRM removal page and grab the current release of the DRM removal tools–as of this writing it is v6.05 available here.
Extract the contents of the zip file to a temporary location. There are several sub-folders within the pack, but the one we’re interested in is \DeDRM_calibre_plugin\; located in that folder is DeDRM_plugin.zip. After confirming you have properly extracted the archive and the zip file in question is accounted for, fire up Calibre.
2013-05-09_121752
Click on Preferences on the toolbar and select “Change calibre behavior” (or, alternatively, press CTRL+P). Don’t select “Get plugins to enhance calibre” as that only gives you access to the official Calibre plugin repository and won’t allow you to add your own third-party plugins.
Scroll down to the Advanced section and click on Plugins.
2013-05-09_122125
Within the Plugins menu, click on the “Load plugin from file” button in the lower right hand corner:
2013-05-09_122208
Browse to the location of the DeDRM_plugin.zip, select and add it. You will receive a warning about the dangers of installing third-party plugins. Go ahead and click OK. You will see a dialog box indicating a successful installation:
2013-05-09_122337
Click OK and confirm that DeDRM is found in the “File type plugins” list. After confirming, click Apply in the upper left corner, close the Preferences pane, and restart Calibre.

Using Apprentice Alf’s DRM Removal Plugins

At this point, we’re ready to start stripping the DRM from our books. The DRM-removal plugins automatically strip the DRM from the books on import. If you’ve previously imported books to Calibre that have DRM, you’ll need to export them and import them again to initiate the DRM-removal process.
For books that are not currently in Calibre, all you need to do to strip the DRM from the book is to simply drag and drop the book into Calibre (or use the Import file function).
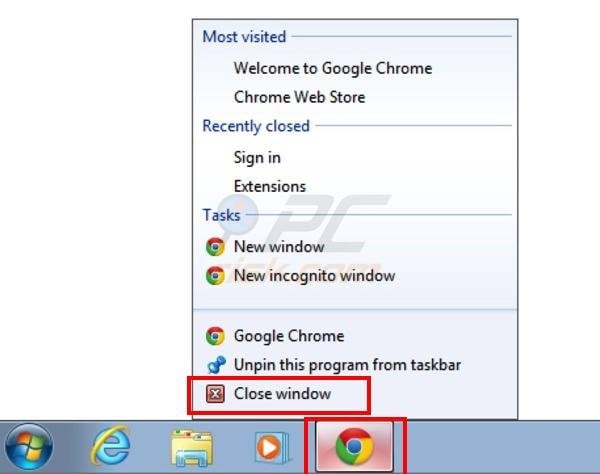
There are several ways to go about getting your DRM-loaded Kindle books. You can:
  1. Mount your Kindle as a USB device and pull them off.
  2. Download them via the Actions menu in the Manage My Kindle section of your Amazon account.
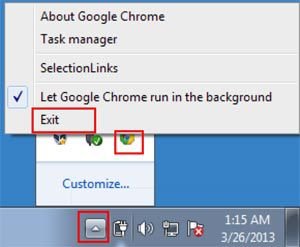
  3. Download them using the Kindle for PC app.
Let’s look at each technique in order to highlight the benefits/shortcomings and what you need to do.
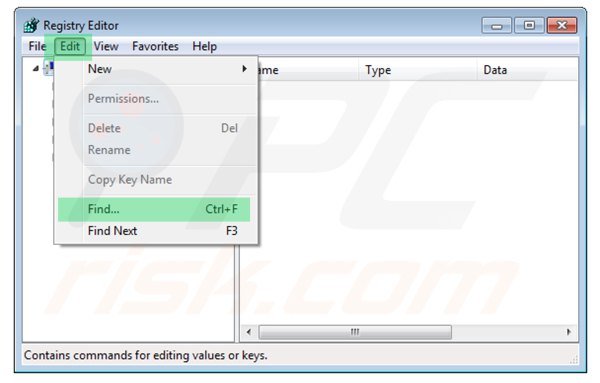
Copying the Books from Your Kindle: If you’re going to rip the book directly from your Kindle device (or use the download and transfer technique), you need to manually enter the serial number of your Kindle into the DeDRM removal plugin. Do so by navigating back to Preferences -> Advanced -> Plugins -> File type plugins and double clicking on the entry for DeDRM. You’ll see a box like so:
2013-05-09_131329
Click on the first entry “eInk Kindle ebooks” and, in the resulting dialog box, click the + sign and enter the serial number off the back of your Kindle.
2013-05-09_131404
Double check the serial number; any discrepancy between the serial number in the book file and the plugin will lead to decryption failure.
Grabbing Copies of Your Books via the Download & Transfer Technique: The second method you can use is to download the book directly from your Manage My Kindle page within your Amazon account. There’s a little “Actions” pull down menu located on the right hand side next to each book’s entry.
2013-05-09_124144
We found this technique to be lacking in several ways. You have to select a physical Kindle as the destination device and you have to enter the serial number of the device into DeDRM (just like in the previous step). On top of that, this was the only technique that didn’t yield consistent 100% success in our testing. If you absolutely must use this approach, give it a shot, but we can’t recommend it in light of how well the other two methods work.
Downloading Your Books via the Kindle for PC App: If instead you have sent your Kindle books to Kindle for PC, and we strongly recommend this method because it’s so easy, you can find the locally stored books in the following directory:
C:\Users\[Your Windows Username]\Documents\My Kindle Content
Each Kindle book you import to Kindle for PC will have two companion files (.MBP and .PHL files); you can ignore the extraneous file types. Books will also have odd names, like “B001QTXLQ4_EBOK”. Don’t worry the proper name and author data are stored in the files. This technique is nice because you can snatch all your books in one swoop and dump them into Calibre. Simply select all the actual book files (all the .AZW, .TPZ, and .MOBI files) and dump them right into Calibre to import them.
Now, Calibre will import any ebook file (DRM-laden or DRM-free) without a hiccup. The real test of whether or not the import-and-strip process has worked properly is to try and convert the book into a new format. Right click on the entry for the new book and select Convert Books -> Convert Individually. This will pull up the conversion menu. Convert it to any other format, it doesn’t matter which.
If the book’s DRM hasn’t been properly removed, you’ll get an error like this: 2013-05-09_132334
Now, this error does not necessarily mean that the DeDRM plugin isn’t working properly. If you’re loading books off your physical Kindle and you entered the serial number wrong in the DeDRM configuration, the process would fail like this. If you tried to add Kindle books that you’re not the actual owner of, it will also fail.
Load the books from the proper source, however, and the process starts successfully. You’ll see the little “Jobs” marker in the lower right hand corner twirling away. Click on it and you will see your conversion process (note the Error entries, those were books that we knew didn’t meet the criteria for the DRM-removal process and we threw at the system anyway, all in the name of thoroughness).
2013-05-09_130711
The end result of the process was a DRM-free book that had been successfully converted to a generic MOBI file–ready to transfer to any device we wished, or to be converted into a new format.

That’s all there is 

Saturday 25 February 2017

Remove a Google Chrome extension "Installed by enterprise policy"

Google Chrome extension "Installed by enterprise policy" - how to remove?

This removal guide shows how to remove a Google Chrome extension that was "Installed by enterprise policy". Note that recently, there is a rise in adware infections, and in many cases, these potentially unwanted programs (PUPs) install on users' Internet browsers disguised as legitimate extensions. Commonly, potentially unwanted applications are bundled with free software downloaded from the Internet, the installation of which, is often a consequence of not paying close attention to the installation steps.
To avoid inadvertent adware or PUP installation, Internet users should always install freeware choosing the 'Custom Installation' option rather than 'Typical Installation' - and be sure to opt-out of any changes to your Internet browser settings. Also, disallow installation of any additional software. In this removal guide I will demonstrate how to remove the "Coupon Server" Google Chrome extension that is marked as "Installed by enterprise policy". I chose this extension simply as an example, however, this removal guide is generic and will help you to remove any Chrome extension that is marked as installed by enterprise policy.
To check the Google Chrome extensions: Click on the bars icon (top right corner of Google Chrome), select 'Tools' and click 'Extensions'.
Checking Google Chrome extensions list
Here is an example of a Chrome extension that is marked as "Installed by enterprise policy" (it is greyed-out, and therefore, users are unable to disable or remove it):
Google Chrome extension "Installed by enterprise policy" example
When dealing with "Installed by enterprise policy" Google Chrome extensions, first check for any recently-installed software within your operating system's 'Add/remove programs'. In some cases, uninstalling this software will also eliminate the associated Internet browser extension.
Windows 8 users:
Right-click in the lower left corner of the screen, in the Quick Access Menu select "Control Panel". In the opened window choose "Uninstall a Program." Look for recently added software, select the entry and click Uninstall.
Windows 7 users:
Click "Start" ("Windows Logo" in the bottom left corner of your desktop), choose "Control Panel". Locate "Programs and Features". Look for recently added software, select the entry and click Uninstall.
Windows XP users:
Click "Start", choose "Settings" and click "Control Panel". Locate and click "Add or Remove Programs". Locate "Programs and Features". Look for "recently added software, select this entry, and click Remove.
Uninstalling potentially unwanted applications via Control Panel
After uninstalling the unwanted software, check your Internet browser extensions. If you continue to observe unwanted entries in your Google Chrome extensions list, continue with the removal instructions.
Firstly, you need to make a note of the ID of the unwanted "Installed by enterprise policy" extension. You will need this in later removal steps to verify the ID of an extension. Click on the bars icon (top right of the Google Chrome), select "Tools" and click on "Extensions", select "Developer Mode". 
Checking the id number of the Google Chrome extension
To remove the "Installed by enterprise policy" Chrome extension, you firstly need to close Google Chrome:
Close Google Chrome
Close any runing Google Chrome browsers
After closing Google Chrome, remove the registry entries of the "Installed by enterprise policy" extension:
In Windows XP - Click Start, Run. In the opened window type "regedit".
Start, run in Windows XP
regedit Windows XP
In Windows 7 - Click Windows Logo (Start), in the "Search Programs and Files" field, type "regedit" and press Enter.
Windows 7 regedit
In the opened Registry Editor click "Edit" and select "Find...".
Finding the registry entries of the "Installed by enterprise policy" extension
In the opened window paste the ID of the "Installed by enterprise policy" Chrome extension which you are trying to remove and click "Find next" button.
Finding the registry entries of the "Installed by enterprise policy" Google Chrome extension step 2
Remove the registry key matching the Data value of the "Installed by enterprise policy" extension's ID (right click on the registry key and select "Delete"):
Deleting the registry entry of an "Installed by enterprise policy" extension
Confirm that you want to remove the registry entry by clicking "Yes" button.
Confirm value delete
After removing the registry entry of the "Installed by enterprise policy" Chrome extension, remove the associated files. To do this, Open "My Computer" and navigate to "C:\Users\YOUR USER NAME\AppData\Local\Google\Chrome\User Data\Default\Extensions". Remove the directory matching the ID of the "Installed by enterprise policy" Chrome Extension.
You can access your AppData directory by typing %USERPROFILE% (Windows XP) or %localappdata% (Windows 7 and Windows 8),  in the Run dialog box.
"Installed by enterprise policy" Google Chrome extension files removal
Navigate to C:\Windows\System32\GroupPolicy\Machine (or C:\Windows\System32\GroupPolicy\User) folder and remove the file named Registry.pol
Removing registry.pol file
Finally open Google Chrome and check the extensions list. The "Installed by enterprise policy" extension should now be removed.
"Installed by enterprise policy" Chrome extension removed

Complete Setup Guide for Ruby, Cucumber and Watir on Windows

  Introduction

This is an updated version of our previous post on getting a cucumber installation set up on Windows. It has become one of the most popular resources for this on the web, but has aged a little since we published it in 2011.
With this updated guide, we’d like to kick off a new round of cucumber-related blog posts.

What is Cucumber?

Cucumber is an Open Source software tool for test automation. Its basic concept is that test cases should be captured in human language (a form of structured English called gherkin), but automating the execution of test cases is best done in a programming language. The cucumber tool provides the glue between the two, reporting test results in the human language again.
The next post in the series will provide an introduction to basic cucumber concepts

Installation

We’ll start this round of cucumber posts with installation instructions so you can follow the next posts as you read them.
After following these instructions, you will have installed cucumber, as well as Watir, a convenient wrapper around the industry leading Selenium browser automation framework, as well as Ruby, the programming language of choice for cucumber test automation. With all three combined, we can test web applications as demonstrated in a later post.

Software Versions

These instructions have been tested on Windows 7 and Windows 8, with both 32bit and 64bit installations. Additionally, Ruby versions 2.0, 2.1 and 2.2 have been used for these instructions.

32bit vs. 64bit

All of the software packages we’re about to install run on 32bit Windows and 64bit Windows, with one small caveat: on 64bit Windows, cucumber will produce warnings about a missing “gherkin lexer”, but otherwise work just fine. If such warnings irritate you, you can work around them with some deeper knowledge of native Ruby gems. Otherwise, we recommend sticking to 32bit packages.

Step 1: Install Ruby

On Windows, the best place to start is the RubyInstaller download page. Download and install the Ruby version of your choice. We’ll use 32bit Ruby 2.2.2 here.
In main installer window, you have four choices to make:
  1. The installation path. We’re going to use C:\Ruby in this example rather than using a version-specific installation path. Whenever you see C:\Ruby, pick the installation path you chose here.
  2. Whether to install Tcl/Tk support. This is not required for cucumber.
  3. Whether to add Ruby executables to your path. This is required for the rest of these posts to work well.
  4. Whether to associate certain files with this Ruby installation. If you have only one version of Ruby installed, this is recommended.
Ruby Installer
Ruby Installer (64 bit)

Step 2: Extract DevKit

DevKit is required for some Ruby packages (called “gems”) to be installed. It can be downloaded from the same downloads page. Note that for Ruby 2.0, 2.1 and 2.2, the same version can be used. We’re using 32bit DevKit here.
The executable is just a self-extracting archive. You can extract the archive anywhere you want, but we’ll use C:\Ruby\devkit here.
DevKit Extraction
DevKit Extraction

Step 3: Install DevKit

Once DevKit is extracted, you need to go to the Windows Command Console to install it.
  1. Run a command by pressing the Windows key and the R key.
  2. Write “cmd” into the input field.
  3. Hit enter.
Run Command Console
Run Command Console
In the command console, go to the DevKit installation path, C:\Ruby\devkit, and enter two commands to finish the DevKit installation.
C:\Users\you> cd \Ruby\devkit
C:\Ruby\devkit> ruby dk.rb init
C:\Ruby\devkit> ruby dk.rb install

Step 4: Install Cucumber and other Ruby gems

Now you’ve got your system set up for Ruby to download and install “gem” packages. To install cucumber, first update the current gem setup:
C:\Users\you> gem update --system
Next, install the gems you need for cucumber web testing. We recommend at least the following:
C:\Users\you> gem install --no-ri --no-rdoc rspec
C:\Users\you> gem install --no-ri --no-rdoc win32console
C:\Users\you> gem install --no-ri --no-rdoc watir-webdriver
C:\Users\you> gem install --no-ri --no-rdoc cucumber
You can also install multiple packages in a single command, e.g.
C:\Users\you> gem install --no-ri --no-rdoc rspec cucumber

Step 5: Run Cucumber

At this point, you should be able to execute cucumber and watch it complain about not having tests to run.
C:\Users\you\Documents> cucumber
No such file or directory - features. You can use
    `cucumber --init` to get started.
Let’s do what cucumber suggests, shall we?
C:\Users\you\Documents> cucumber --init
  create   features
  create   features/step_definitions
  create   features/support
  create   features/support/env.rb
We’ll explain all the stuff that gets created here later. Right now, if we run cucumber again now, it’ll complain a lot less:
C:\Users\you\Documents> cucumber
0 scenarios
0 steps
0m0.000s
And there you have it! Cucumber runs zero test scenarios containing zero steps, in zero seconds. That seems about right for a fresh installation!

Step 6: Install Bundler

Installing Ruby gems via the gem command is generally the way to install packages system-wide. If you work a lot on test automation suites, though, it’s quite likely that you want different versions of each package for different projects. For this purpose, the Ruby community has come up with bundler, which we thoroughly recommend to use in your test automation projects.
C:\> gem install bundler
We’ll discuss the use of bundler in later posts, but for now you should just install it so we can refer to it later.